How to assign a Static IP Address in Windows 7, 8, 10, XP, or Vista for free
Your end devices need a static IP Address so as to receive incoming traffic through port forwarding
Dynamic IP, Static IP, what??!
The words dynamic and static mean exactly what you think they mean. Dynamic is something that changes frequently, like your hairstyle, and static is something that stays constant, like your name (but can be changed if needed). If your computer has a dynamic IP, its IP address will change every time your computer is rebooted. If it has a static IP, it stays fixed unless manually changed by the user. Below is the step by step process to change the ip address to static
Step-1,Preparation - Lets take a note of the current setup
- Let’s get to setting up a static IP for your windows computer. We need few details before we can actually do the static IP setup.
- Hit the windows button on your keyboard or click the windows icon on the lower left side of your screen to bring up the start menu. Simply type "cmd" and hit enter. Windows command prompt will be in front of you
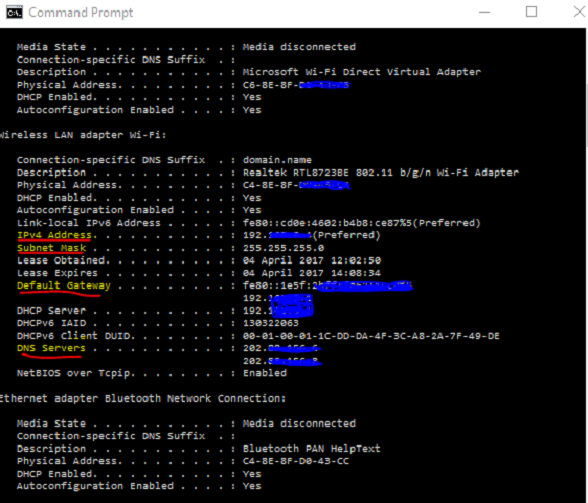
- In the command prompt window that popped up, type ipconfig/all and hit enter. Your computer’s network details popup on screen, as shown in the image. Look for the values underlined in red in the screenshot. Make a note of the following IP’s in a notepad(underlined in red): IPv4 Address, Subnet Mask, Default Gateway and DNS Servers. Once noted, you can close the command prompt window.

Step-2, Assign a static IP Address to your Windows PC
- For Windows 7 or Windows 8.x or Windows 10: Simply type network and sharing into the Search box in the Start Menu (or just press windows key and start typing) and select "Network and Sharing Center" when it comes up
To Setup Static IP in Windows Vista : Open the Start Menu, right-click on "Network", and select "Properties".Then click on "Manage network connections".
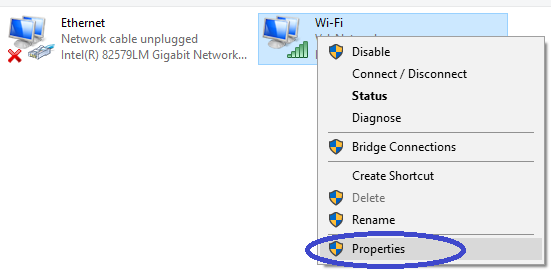
To Setup Static IP in Windows XP : Right-click on "My Network Places" and select "Properties" - Now, you have reached the Network Connections window, as seen below. You may see more than one network available. Determine which network is in use (simply pick the one that is connected) right click and select properties.

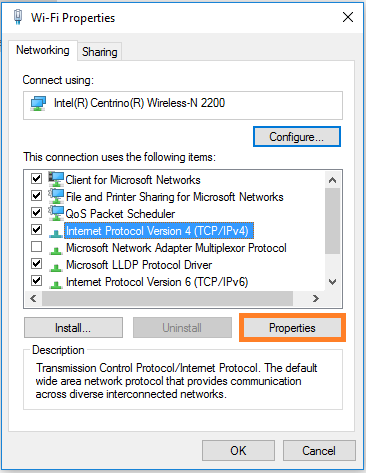
- In the network’s properties window, scroll down till you find the Internet Protocol Version 4 option. Click it and hit the properties option available below it.

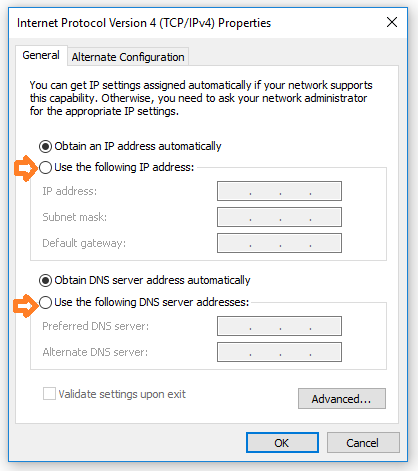
- Now its time to setup a static IP Address. The step we’ve been patiently waiting for.You should now see a screen like the one below. Take a snapshot of this window. In case anything goes wrong we can refer it to revert settings to default

- Select the "Use the following IP address" radio button. Enter a new IP address here. You can pick an IP similar to the one assigned earlier by the router. Remember the IPv4 Address you saved in step 2? If it was 192.150.12.1, you can enter 192.150.12.10. Stay within the 10-255 (that is the max value possible) range.
- Again, take the values saved in step 1 and fill in the subnet mask and default gateway. Type in the exact same values. Lastly, select Choose the following DNS server address radio button and fill in the DNS Servers value copied in step 1
- Click "OK" and close all open windows. Quickly follow step 1 again. The IPv4 address displayed should be of what you just entered. Reboot the computer and perform step 1. If the IP has stayed the same, you have successfully set a static IP for your windows computer.
Cheers!
moIrving
posted onEnjoy great content like this and a lot more !
Signup for a free account to write a post / comment / upvote posts. Its simple and takes less than 5 seconds